
Learn Streamlit
By: Nick Antonaccio (nick@com-pute.com)
This tutorial demonstrates how to use the Python
Streamlit library to build more than 20 basic
CRUD and database web apps.
Contents:
1. How to View This Tutorial Best on Your Device2. Prerequisites
3. What is Streamlit?
4. Why Use Streamlit?
5. Getting Started
5.1 Hello World
5.2 Using the Python Standard Library with Streamlit
5.3 Interacting with Web APIs
5.4 A Pokemon API Example
5.5 Cocktail Database API Example
5.6 More Streamlit Input and Output Widgets
5.7 Just Assign and Pass Around Variables
6. Streamlit Program Flow
6.1 Layout
6.2 Persistant Values and Caching
7. Building Basic CRUD Database Apps With Streamlit
7.1 A Quick Python SQL Primer
7.2 (De)Serializing Python Lists and Other Data Structures in Sqlite
7.3 Wiring up SQL Statements with Streamlit User Interface Widgets
7.4 Finishing Up a Basic CRUD App: Adding Buttons to Update and Delete
7.5 Working with Images, Sounds & Videos - Image Database App
7.6 Working With Dates and Times - Calendar Database App
8. Some More Typical Crud Layout Patterns, Columns and Single Forms
8.1 Moving Past Repeating Layouts With St.expander(), Using St.columns()
8.2 Traditional Single Form Layouts
8.3 Using Dataframe Grids to Display Database Contents
9. More Simple Example Apps to Demonstrate Streamlit Basics in Practice
9.1 Time Between Dates
9.2 Live Webcam Viewer
9.3 Coin Flip
9.4 Word Count
9.5 Pig Latin Generator
9.6 Calculator
9.7 Dynamically Generated Mad Libs
9.8 Markdown Editor
9.9 Chat Room (With Message Data Saved to Text File)
9.10 Chat Room (With Message Data Saved to Sqlite Database)
9.11 Multiple Topic (Multi-Room) Chat
9.12 Minimal Cash Register
9.13 Cash Register Part Two: Saving Receipts & Generating Sales Reports
9.14 Shift Clock
9.15 FTP File Manager
10. Installing and Running Streamlit on a Local Computer
11. Multi-Page Streamlit Sites
11.1 Using Containers and St.Sidebar()
11.2 True Multi-Page Apps From Multiple Scripts
12. Using FastAPI to Serve Data Manipulated by Streamlit Apps
13. Page Configuration
14. Where To Go From Here
14.1 Streamlit Documentation, Blog, and Forum
14.2 Streamlit Components
15. About the Author
1. How to View This Tutorial Best on Your Device
In some desktop browsers, the text and images on this page may initially appear small. Press 'CTRL' and '+' on your keyboard to enlarge the document so it fills your screen. If you're reading on a mobile device, pinch and zoom to expand any images/code. If you have a very small screen, turn your phone sideways lengthwise to rotate the view into landscape mode. That will provide the largest possible view of the document contents. You may want to refresh your browser after rotating into landscape mode, so that every bit of text fills the screen as neatly as possible. You can also choose to view in 'simplified' mode, if your mobile browser suggests that option.
2. Prerequisites
You should have a fundamental understanding of Python to begin this tutorial. If you haven't written Python (or any other) code before, you may want to start with pythonanvil.com. That free 200+ page mini course teaches everything you need to know to create several dozen complete web apps, using another pure Python framework (Anvil), without any prior programming knowledge required. Many of the app ideas and explained generic Python code examples in that Anvil mini-course are shared with this tutorial, so it's a perfect beginner's prerequisite for this text.
3. What is Streamlit?
Streamlit is a Python library that enables developers to quickly build rich interactive front-end user interfaces (web page layouts) with very little code. You can use Streamlit together with any database system available in Python, to form an easy to use full stack web development toolkit, especially suitable for in-house projects where productivity and speedy development iterations are a priority. A significant portion of this tutorial will focus on creating CRUD data management apps by integrating Streamlit with SQL commands and the Sqlite database system. Another large section of the tutorial demonstrates Streamlit code patterns in practice using small example apps.
The example below is a complete application which allows users to Create, Read, Update, and Delete database entries with Streamlit forms. These 22 lines are the entire code listing required to build and configure every part of the app, including the user interface and all database interactions:
import streamlit as st, ast, sqlite3
con=sqlite3.connect('db.db')
cur=con.cursor()
cur.execute('CREATE TABLE IF NOT EXISTS db(name TEXT, letters TEXT, note TEXT)')

if st.button('Add New Row'):
  cur.execute('INSERT INTO db(name, letters, note) VALUES(?,?,?)', ('','[]',''))
  con.commit()

for row in cur.execute('SELECT rowid, name, letters, note FROM db ORDER BY name'):
  with st.expander(row[1]):
    with st.form(f'ID-{row[0]}'):
      name=st.text_input('Name', row[1])
      letters=st.multiselect('Letters', ['A', 'B', 'C'], ast.literal_eval(row[2]))
      note=st.text_area('Note', row[3])
      if st.form_submit_button('Save'):
        cur.execute(
          'UPDATE db SET name=?, letters=?, note=? WHERE name=?;',
          (name, str(letters), note, str(row[1]))
        )
        con.commit() ; st.experimental_rerun()
      if st.form_submit_button("Delete"):
        cur.execute(f'DELETE FROM db WHERE rowid="{row[0]}";')
        con.commit() ; st.experimental_rerun()
Here's a live version of the app, which is hosted for free using Streamlit Cloud:


Here's a slightly altered version of the app above, which stores and displays images and related info:

4. Why Use Streamlit?
Streamlit is designed to be used as a presentation tool for data scientists, so it's greatest strength is integrating all the best-of-breed Python visualization, analysis, machine learning and artificial intelligence libraries: Pandas, Numpy, Matplotlib, Tensorflow, OpenCV, PyTorch, Theano, Plotly, Altair, Bokeh, GraphViz, PyDeck, Vegalite, as well as all the standard library and any other library/tool in the Python world.
Streamlit requires only Python to build rich web interfaces (absolutely no HTML/CCS/JS needed), and enables developers to use any Python code natively on the back end to perform complex data management, AI, machine learning, API consumption, and connectivity tasks in minutes.
You can run Streamlit/Python web apps immediately on iPhone, iPad, Android, Windows, Mac, Linux, Chromebook, etc., without any installation on those devices. The only requirements to run Streamlit are a vanilla install of Python on a local (i.e., WIFI connected) Windows, Mac, or Linux machine, or on a cloud server platform, a quick pip install of the Streamlit library, and any text editor.
Streamlit is free and open source, and it's backed by a well funded company. Streamlit Cloud provides a convenient free hosted solution which enables instant deployment, without any time-consuming tasks or costs typically associated with web app publication. GIT integration is built directly into Streamlit's free hosting platform (hosted apps update automatically whenever files in a project's Github repository are committed). There is no vendor lock-in of any sort - you can host apps on-site locally or using AWS, Google Cloud, Azure, Digital Ocean, Heroku, etc.
5. Getting Started
To get started with this tutorial, click the link below:
The livecode editor above runs in your browser, and immediately displays the results of edited Streamlit code. You can even run this editor in the web browser of any modern mobile device:

(The livecode editor used here was created in Streamlit by Sam Dobson, based on work by Okld, using the JS Ace Editor.)
5.1 Hello World
In the livecode editor, replace the default code:
st.write('Hello')With the following code:
if st.button('click me'):
  st.write('Hello World!')
Click the 'Apply' button at the bottom right corner of the editor (or press the CTRL+Enter keys on your keyboard), and you'll see a new app refresh below the editor. Click the newly displayed 'Click Me' button, and you'll see a 'Hello World!' message appear:
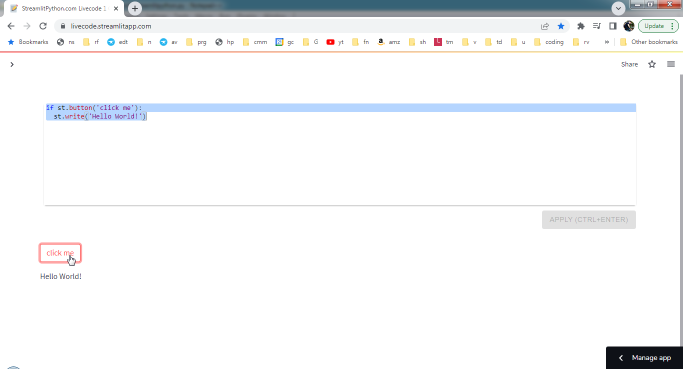
That's it - just 2 lines of code, and we've got an interactive web app.
Notice that the 'st.write()' method is used by Streamlit to display values. The 'st.button()' method is used to present a clickable button widget. An 'if' evaluation is used to run some Python code every time the button is clicked.
IMPORTANT: by default in Streamlit apps, the entire script is re-run every time a user interacts with any sort of input widget. We'll cover more about how this works, later in the tutorial.
If you receive any errors when running a script in the livecode editor, click the 'Manage app' button in the bottom right hand corner of the screen, to see detailed debugging information.
5.2 Using the Python Standard Library with Streamlit
Now replace the code in the editor with the following (then click 'Apply', or press CTRL+Enter):
import datetime

if st.button('Current Time'):
  st.write(datetime.datetime.now())

With that bit of code, we're now using a function from the standard Python library, directly within the same single script file which produces the web browser interface. The front-end and back-end code is all in that one file. Instead of being stuck at a desktop console printing text, users can interact with this Python code on a mobile phone/tablet, or any other device that has a browser.
Hold on to your seats, we're just getting started...
5.3 Interacting with Web APIs
Next, run this code:
import requests

st.header('Guess Age From Name')
name=st.text_input('Your Name')
if name:
  r=requests.get(f'https://api.agify.io/?name={name}').json()
  st.write(f'Your age is predicted to be {r["age"]}')

The example above uses the Python 'requests' library to read data from the web API at www.agify.io (the requests library has been pre-installed on the cloud server running our live code editor - that only takes a moment to pip install, whenever you want to run Streamlit in your own Python production environment).
Notice that the 'st.text_input()' method in the code above is used to display a text field input widget. The value typed by the user into the text_input widget is stored in the variable 'name'. As with the button in the previous example, we use an 'if' evaluation here to run some Python code any time that variable is changed (entered in the text_input widget) by the user. Note that any time the user interacts with the st.text_input() widget, the entire script is re-run, using that new variable value assigned to the widget's text contents.
Notice also the 'st.header()' widget, which adds a big text title to the app layout.
5.4 A Pokemon API Example
Now let's look at another web API example to get more familiar with Streamlit methods. Note that in the livecode editor we're using, the Streamlit library is imported by default. In any other environment, you'll need to import Streamlit, so all the examples in this tutorial going forward will include Streamlit in the library imports. Streamlit is conventionally imported as 'st':
import streamlit as st, requests

st.header('Pokemon Images')
mypokemon=['charizard','pikachu','eevee','snorlax','garchomp','lucario']
pokemon=st.selectbox('Select a Pokemon', mypokemon)
if pokemon:
  r=requests.get(f'https://pokeapi.co/api/v2/pokemon/{pokemon}').json()
  for img in r['sprites'].values():
    if img is not None:
      if str(img)[-4:]=='.png':
        st.image(img)
The example above uses an 'st.selectbox()' widget to allow users to choose Pokemon characters from a drop-down list. A 'for' loop and some 'if' evaluations are employed to parse the json returned from pokeapi.co's API, and an 'st.image()' widget is used to display any linked images found in the results:
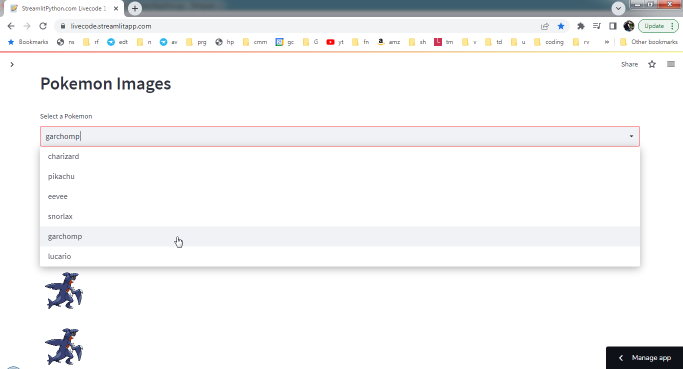
It's important to realize that most of the example above is just basic Python code, exactly like what you'd use in a command line Python REPL, or in simple desktop console scripts. In these examples, we're just adding a few 'st.
()' methods to get input from the user, and to display results on the web page. The typical Python code runs on the server where Streamlit is running, and the Streamlit user interface widgets run in the browser. Streamlit takes care of transporting all the data between server machine, and client web browsers, transparently. It's extraordinarily simple to learn.
5.5 Cocktail Database API Example
Here's another similar API example to clarify how to incorporate Streamlit with typical 'console style' Python code:
import streamlit as st, requests

drinks=requests.get(
  f'https://thecocktaildb.com/api/json/v1/1/list.php?i=list'
).json()
ingredients=[]
for drink in drinks['drinks']:
  ingredients.append(drink['strIngredient1'])

st.title('The Cocktail DB API')
st.markdown('---')
selected=st.selectbox('Select an Ingredient', ingredients)
st.markdown('---')
if selected:
  st.header(f'Drinks with {selected}')
  r=requests.get(
    f'https://thecocktaildb.com/api/json/v1/1/filter.php?i={selected}'
  ).json()
  for drink in r['drinks']:
    st.subheader(drink['strDrink'])
    st.image(drink['strDrinkThumb'])

In the example above, Streamlit takes care of executing all the widget code in the user's browser, and the server code on the computer where Streamlit is running, without the developer needing to differentiate anything about where in the web stack those processes occur:
##### THIS CODE RUNS ON THE SERVER #####
import streamlit as st, requests

drinks=requests.get(
  f'https://thecocktaildb.com/api/json/v1/1/list.php?i=list'
).json()
ingredients=[]
for drink in drinks['drinks']:
  ingredients.append(drink['strIngredient1'])

##### THIS CODE RUNS IN THE BROSWER #####
st.title('The Cocktail DB API')
st.markdown('---')
selected=st.selectbox('Select an Ingredient', ingredients)
st.markdown('---')
if selected:
  st.header(f'Drinks with {selected}')

##### THIS CODE RUNS ON THE SERVER #####
  r=requests.get(
    f'https://thecocktaildb.com/api/json/v1/1/filter.php?i={selected}'
  ).json()
  for drink in r['drinks']:

##### THIS CODE RUNS IN THE BROWSER #####
    st.subheader(drink['strDrink'])
    st.image(drink['strDrinkThumb'])
This is Streamlit's magic: the full stack machinery needed for what are traditionally complicated client-server interactions, is created with one code file, using a straightforward and familiar linear thought process. You can pass variables around in a single script, almost as if all the code is running on a single machine, and Streamlit gets the data back and forth between server computer and client browsers, without any effort on the developer's part. This is quite different from the traditional full stack development routine.
5.6 More Streamlit Input and Output Widgets
Here's a demo of many Steamlit UI input and display elements. You can find the API documentation for all these widgets at https://docs.streamlit.io/library/api-reference/widgets (bookmark that page):
import streamlit as st

st.title('Title')
st.header('Header')
st.subheader('Subheader')
st.caption('Caption')
st.code('print("this is some code")')
st.text('Text')
st.markdown('- *Markdown*')
st.latex('\sum_{k=0}^{n-1} ar^k')
st.dataframe(pd.DataFrame({'a':[1, 2, 3],'b':['A', 'B', 'C']}))
st.table({'a':[1, 2, 3],'b':['A', 'B', 'C']})
st.metric('Temp', '75', '5')
st.metric('Wind', '9', '-4')
st.json({'a':[1, 2, 3],'b':['A', 'B', 'C']})
st.button('Button')
st.download_button('Download Button', b'asdf')
st.checkbox('Checkbox')
st.radio('Radio',[1,2,3])
st.selectbox('Selectbox', ['a','b','c'])
st.multiselect('Multiselect', ['a','b','c'])
st.slider('Slider')
st.select_slider('Select Slider', ['a','b','c'])
st.text_input('Text Input')
st.number_input('Number Input')
st.text_area('Text Area')
st.date_input('Date Input')
st.time_input('Time Input')
st.file_uploader('File Uploader')
st.camera_input('Camera')
st.color_picker('Color Picker')
st.image('tulips.jpg')
st.audio('audio.mp3')
st.video('video.mp4')
st.sidebar.selectbox('Menu', ['a','b','c'])
col1, col2 = st.columns([1,2])
col1.text_input('Thinner Column')
col2.text_input('Thicker Column')
tab1, tab2 = st.tabs(['TAB 1','TAB 2'])
tab1.text_area('text in tab 1')
tab2.date_input('date in tab 2')
st.expander('Expander')
st.container()
placeholder = st.empty()
placeholder.text('Hide this placeholder container')
if st.button('Hide'): placeholder.empty()
st.progress(35)
st.spinner('Spinner')
if st.checkbox('Balloons', False):
  st.balloons()
if st.checkbox('Snow', False):
  st.snow()
st.error('Error')
st.warning('Warning')
st.info('Info')
st.success('Success')
st.exception(RuntimeError('This is a fake error.'))
# st.form('')
# st.form_submit_button('')
import numpy as np
df=pd.DataFrame(np.random.randn(20, 3), columns=['a', 'b', 'c'])
st.line_chart(df)
st.area_chart(df)
st.bar_chart(df)
treemap=pd.read_csv('trees2.csv')
st.write(treemap)
st.map(treemap)


5.7 Just Assign and Pass Around Variables
Most of the methods above run in the browser, to display user interface elements - but a few, such as file_uploader, download_button, image, audio, and video, transfer data between server and client inherently.
All of the input widgets can be assigned variables, and those variables can be used in normal Python code that runs on the server. For example, the code below gets a value from the user, in the browser, and then writes that data to the server hard drive, using some typical file operations in 'console style' Python code:
import streamlit as st
note=st.text_input('Enter a Note')
if note:
  with open('notes.txt', 'a+') as file:
    file.write(f'{note}\n')

Vice-versa is true too - you can assign a variable to code which runs on the server, and display that data in the browser, simply by using the variable in a Streamlit widget method:
import streamlit as st
with open('notes.txt', 'r+') as file:
  st.text(file.read())

That's just the tip of the iceberg. Streamlit has built-in support for many of the most popular Python graphing and visualization libraries, as well as a world of powerful free components created by the community, which enable interesting UI/layout/design features (including complex data grids), advanced graphics/audio/video processing, geographical mapping, real time videoconferencing, integrations with third party apps such as Discourse and Disqus, and much more, all with very little code, and all using pure Python.
https://streamlit.io/components

6. Streamlit Program Flow
As you've seen, any time a user interacts with a Streamlit input widget, the default response is that the entire script is re-evaluated with the new value entered into that widget. This generally saves Streamlit developers lots of work assigning call-back functions and managing state, but can lead to some challenges.
6.1 Layout
In most applications, there will be situations where you don't want Streamlit to re-evaluate the entire script every time a value is entered into a widget, or situations in which you need to save previously entered values, for example. The most common of those situations occurs when using forms, where you only want to process a group of entered values once they've all been entered by the user:
import streamlit as st

with st.form('My Form', clear_on_submit=True):
  name=st.text_input('Name')
  mrkdwn=st.text_area('Markdown', '## Subheader\n- item 1\n- item 2')
  file=st.file_uploader('Image', ['png', 'jpg', 'gif', 'bmp'])
  if st.form_submit_button('Submit'):
    st.markdown(f'# {name}\n{mrkdwn}')
    st.image(file)

The variable values in a form are not evaluated until the st.form_submit_button() widget is clicked. At that point, the entire script is re-run using those input values.
You can include as many forms as you need on a page, and include as many st.form_submit_button() widgets as needed in each form, to process data in different ways. Each form should have a unique name:
import streamlit as st

with st.form('Form 1', clear_on_submit=True):
  name=st.text_input('Name')
  if st.form_submit_button('Update'):
    # run some database code
    st.write(f'Name updated to {name}')
  if st.form_submit_button('Delete'):
    # run some database code
    st.write(f'Name {name} deleted')
with st.form('Form 2', clear_on_submit=True):
  hobby=st.text_input('Hobby')
  if st.form_submit_button('Save'):
    # run some database code
    st.write(f'{hobby} saved')

You may notice in the example above that the 'Name updated to {name}' notification displayed by st.write() appears at an odd location on screen, directly below the form submit button - because that's where it appears in the code. Streamlit scripts are always simply run top to bottom, and re-evaluated every time new input values are entered into the running app. In order to place that update notification somewhere else in the layout, we can use st.empty() as follows:
import streamlit as st

message_area=st.empty()
with st.form('Form 1', clear_on_submit=True):
  name=st.text_input('Name')
  if st.form_submit_button('Update'):
    # run some database code
    message_area.write(f'Name updated to {name}')
  if st.form_submit_button('Delete'):
    # run some database code
    message_area.write(f'Name {name} deleted')

There are a number of other containers which can be used to place widgets on screen in desired layouts. Here are two different syntactic ways to place widgets into st.columns() containers:
import streamlit as st

col1, col2, col3=st.columns([1,3,2])
col1.image("https://static.streamlit.io/examples/cat.jpg")
col2.text_area('text1')
col3.markdown('## Subheader\n- item 1\n- item 2')

col4, col5, c6=st.columns([1,3,2])
with col4:
  st.image("https://static.streamlit.io/examples/cat.jpg")
with col5:
  st.text_area('text2')
with col6:
  st.markdown('## Subheader\n- item 1\n- item 2')

The first method above is useful when you want to specify the column container in which a single widget should be positioned, especially when multiple widgets are instantiated from separate sections of a script.
The second method is useful when you want to position a larger number of widgets in a given column, all in a single contiguous block of code, using a 'with' context manager, indented beneath the intended column label.
6.2 Persistant Values and Caching
The following script doesn't display an increment, as you might expect - because Streamlit re-runs the script every time the button is clicked. The 'total' variable is reset to zero every time the script re-runs:
total=0
if st.button('+'):
  total+=1
  st.write(total)
To store persistent values during each re-run of a Streamlit script, use st.session_state():
if 'total' not in st.session_state:
  st.session_state.total=0
  # st.session_state['total']=0  # synonymous with the line above
if st.button('+'):
  st.session_state.total+=1
  st.write(st.session_state.total)

To save results of long-running computations, so that those expensive routines are not re-evaluated with each user input interaction, use st.cache():
@st.cache
def long_function(repetitions):
  total=0
  for reps in range(repetitions):
    total+=1
  return total

val=st.number_input('count up to', value=99999999)
if val:
  st.write(f'first run:{long_function(val)}')
  st.write(f'second run, cached value appears quickly: {long_function(val)}')

Notice that the first run of any selected large number requires a long computation. Every time that function is run again with the same selected value, the return value appears immediately, because the computation function uses the saved cache value for when the input argument is identical.
To clear any saved cache values, click the hamburger menu in the upper right hand corner of the Streamlit user interface and select 'Clear cache c'.
You can read more about caching values at https://docs.streamlit.io/library/api-reference/performance.
7. Building Basic CRUD Database Apps With Streamlit
(NOTE: If you're experienced working with SQL in Python, you can skim the next 2 sections of this tutorial. We'll reuse a few lines from these sections repeatedly).
'Create/Read/Update/Delete' (CRUD) operations are a key component of most useful applications, especially those used for business data management (accounting, inventory, billing, payroll, point of sale, scheduling, communications, project management, property management, etc.). Streamlit and Python are a great match for building CRUD web app functionality quickly and easily.
For this tutorial, we'll keep things simple, and use some basic SQL commands to store and retrieve data using the Sqlite database system. Sqlite is built into Python, so there's nothing additional to install (it comes for free as an integrated part of every modern Python distribution). There are many Python options which can be used to migrate from Sqlite to other RDBMSs, whenever you need enterprise level capacity. ORMs (object relational mappers) such as SQLalchemy eliminate the need for SQL code and help unify connectivity between popular database systems such as PostgreSQL, MySQL, MSSQL, Oracle, and others.
7.1 A Quick Python SQL Primer
There are plenty of tutorials online which explain how to use SQL in Python, but for our purposes, we'll cover just a few fundamental snippets which enable you to create a database table, then insert, delete, update, and retrieve rows of data.
First, to use Sqlite, you need to import 'sqlite3' from the Python standard library:
import sqlite3To connect with an Sqlite database, you'll use the .connect method from the sqlite3 library, specifying the name of an Sqlite database file. If this file doesn't exist, it will be created. We'll assign the variable 'con' to refer to this connection:
con=sqlite3.connect('db.db')Next, you'll use the .cursor method of the connected database to send SQL commands to the connected database. We'll assign the variable 'cur' to refer to this cursor:
cur=con.cursor()Next, the .execute method of the cursor is used to send a string containing SQL commands. The first SQL command we'll need, to create a table in the database, is 'CREATE TABLE'. We'll include the 'IF NOT EXISTS' clause, so that this operation only occurs if the table hasn't already been created. Tables can be thought of as rows and columns of information, similar to a spreadsheet grid. The definition of the column names and the type of data each column can contain, is called the table's 'schema'. We'll name this table 'db', and create a schema with 3 columns named 'name', 'letters', and 'note', all of which will store text values:
cur.execute('CREATE TABLE IF NOT EXISTS db(name TEXT, letters TEXT, note TEXT)')To insert data values into the table created above, use the 'INSERT INTO' command. The code below adds a new row of data to the 'name', 'letters', and 'note' columns of the 'db' table, using 3 '?' placeholders, populated with the values ('','[]',''):
cur.execute('INSERT INTO db(name, letters, note) VALUES(?,?,?)', ('','[]',''))Whenever an operation is completed, use the .commit method of the database connection object to save the data to the database (before you do this, SQL commands are simply stored in RAM memory, and results are not yet saved to the database file):
con.commit()To update the values in a row of the database table (also called a 'record'), use the SQL 'UPDATE' command. The following code updates the empty record we created above, with some meaningful values:
cur.execute(
  'UPDATE db SET name=?, letters=?, note=? WHERE name=?;',
  ('John Smith, '["A", "B"]', 'Has a popular name', '')
)
con.commit()
To view records in the database, use the SQL 'SELECT' command. The code below returns the 'rowid', 'name', 'letters', and 'note' columns from the 'db' tables, and sorts them in order by values in the 'name' column:
cur.execute('SELECT rowid, name, letters, note FROM db ORDER BY name')Note that the 'rowid' column is a 'key', auto-generated and auto-incremented by Sqlite, so that each row has a unique identifier. This is done so that rows can be differentiated and referred to specifically, even if there are duplicate values in other fields. The rowid is used to ensure that you perform operations on an intended row - for example, to delete the correct entry for a particular person named John Smith, when there are potentially multiple rows with the name 'John Smith' in the name field.
To delete records, use the 'DELETE' command. The code below deletes the record with rowid 1 from the 'db' table:
cur.execute('DELETE FROM db WHERE rowid="1";')
con.commit()
With those few SQL code examples, we've got enough tools to accomplish some really useful work.
7.2 (De)Serializing Python Lists and Other Data Structures in Sqlite
Depending upon the database system, you'll find support for a wide variety of data types (dates and times, images and binary data, json values, etc.). Some database systems such as PostgreSQL have built-in support for native Python values like lists and dictionaries, in the form of json data types. Sqlite is about as simple as databases come, so to save data structures such as lists, dictionaries, sets, and tuples, we can simply serialize the data to strings, using the Python str() function. When reading strings back from a database, we can use the ast.literal_eval() method to convert saved data structures back to functioning list, dictionary, set and tuple data types.
Ast.literal_eval() is much safer than using the Python eval() function, since it works to only evaluate data structures (as opposed to executable code). This helps sanitize malicious code stored by users in the database. You do not want executable code which has been stored by a user, for example, to be allowed to erase the contents of your hard drive or to unintentionally provide admin rights to a user. That's potentially pretty easy to do if you ever use eval() upon values stored in a database!
A typical pattern we can use to store Python lists to a database looks something like this (notice the str() function applied to the 'letters' list, in the SQL update statement):
name='John Doe'
letters=['A','B','C']
note='John is from Ohio'
cur.execute(
  'UPDATE db SET name=?, letters=?, note=? WHERE name=?;',
  (name, str(letters), note, name)
)
con.commit()
We can get the saved data back from the database using a pattern such as this (notice the ast.literal_eval() method applied to the 'letters' field, retrieved by the SQL select statement):
for row in cur.execute('SELECT rowid, name, letters, note FROM db ORDER BY name'):
  name=row[1]
  letters=ast.literal_eval(row[2])
  note=row[3]
We'll also use datetime methods to format dates properly in upcoming examples
When working with other database systems, it's preferable to use the native data types employed by each particular RDBMS, rather than serializing data types to strings, as is required for Sqlite.
7.3 Wiring up SQL Statements with Streamlit User Interface Widgets
To start making database apps with Streamlit user interfaces that appear in a browser, we just need to mix a few Streamlit widget methods into the SQL code. Here are all the imports, as well as all the database setup code we need, taken verbatim from the previous sections of this tutorial:
import streamlit as st, sqlite3, ast
con=sqlite3.connect('db.db')
cur=con.cursor()
cur.execute('CREATE TABLE IF NOT EXISTS db(name TEXT, letters TEXT, note TEXT)')
To add a new row to the database, we can use an st.button() widget. This SQL code is also taken verbatim from the previous tutorial examples:
if st.button('Add New Row'):
  cur.execute('INSERT INTO db(name, letters, note) VALUES(?,?,?)', ('','[]',''))
  con.commit()
One of the simplest ways to display rows returned from a database query, is to use an st.expander() widget. Streamlit's st.expander() is a bit like an accordion widget - it folds a section of the web page to hide layouts of any complexity, and expands to display the entire selected layout when a user clicks it.
In this first example, we'll use a 'for' loop to generate st.expander() widgets for each row returned from a database query (an SQL select command). Inside each st.expander(), we'll place an st.form() widget, which is used to display a group of st.text_input(), st.multiselect(), and st.text_area() widgets, each presenting a value selected from the database (again, the SQL SELECT code here is taken verbatim from the previous section of this tutorial):
for row in cur.execute('SELECT rowid, name, letters, note FROM db ORDER BY name'):
  with st.expander(row[1]):
    with st.form(f'ID-{row[0]}'):
      name=st.text_input('Name', row[1])
      letters=st.multiselect('Letters', ['A', 'B', 'C'], ast.literal_eval(row[2]))
      note=st.text_area('Note', row[3])
Note that the st.form() widgets above need to have unique keys (the first argument to the st.form() method), so a formatted string is used to concatenate 'ID-' with the 'rowid' value from the database row being displayed:
st.form(f'ID-{row[0]}')
7.4 Finishing Up a Basic CRUD App: Adding Buttons to Update and Delete
We can add st.form_submit_button() widgets to the form code above to execute SQL update and delete statements upon any displayed row values. Note that the buttons in the code below are contained in separate forms created by the for loop, so each row value referenced in the update and delete statements (executed when the user clicks any button widgets) refers to the single particular record displayed in each form. That means, clicking any 'Update' or 'Delete' button performs those operations upon the row of database values displayed on that specific form:
for row in cur.execute('SELECT rowid, name, letters, note FROM db ORDER BY name'):
  with st.expander(row[1]):
    with st.form(f'ID-{row[0]}'):
      name=st.text_input('Name', row[1])
      letters=st.multiselect('Letters', ['A', 'B', 'C'], ast.literal_eval(row[2]))
      note=st.text_area('Note', row[3])
      if st.form_submit_button('Save'):
        cur.execute(
          'UPDATE db SET name=?, letters=?, note=? WHERE name=?;',
          (name, str(letters), note, str(row[1]))
        )
        con.commit()
        st.experimental_rerun()
      if st.form_submit_button("Delete"):
        cur.execute(f'DELETE FROM db WHERE rowid="{row[0]}";')
        con.commit()
        st.experimental_rerun()
Note that the st.experimental_rerun() method is executed after both the update and delete operations. This just refreshes the entire page display with newly updated query values read from the database.
Believe it or not, that's all we need to create a complete CRUD database web app with Streamlit. This is the full code listing (the same example presented at the introduction of this tutorial):
import streamlit as st, ast, sqlite3
con=sqlite3.connect('db.db')
cur=con.cursor()
cur.execute('CREATE TABLE IF NOT EXISTS db(name TEXT, letters TEXT, note TEXT)')

if st.button('Add New Row'):
  cur.execute('INSERT INTO db(name, letters, note) VALUES(?,?,?)', ('','[]',''))
  con.commit()

for row in cur.execute('SELECT rowid, name, letters, note FROM db ORDER BY name'):
  with st.expander(row[1]):
    with st.form(f'ID-{row[0]}'):
      name=st.text_input('Name', row[1])
      letters=st.multiselect('Letters', ['A', 'B', 'C'], ast.literal_eval(row[2]))
      note=st.text_area('Note', row[3])
      if st.form_submit_button('Save'):
        cur.execute(
          'UPDATE db SET name=?, letters=?, note=? WHERE name=?;',
          (name, str(letters), note, str(row[1]))
        )
        con.commit() ; st.experimental_rerun()
      if st.form_submit_button("Delete"):
        cur.execute(f'DELETE FROM db WHERE rowid="{row[0]}";')
        con.commit() ; st.experimental_rerun()
Paste that example into the livecode editor at livecode.streamlitapp.com, to see it run!
7.5 Working with Images, Sounds & Videos - Image Database App
We can take the example above as a model, change the schema of the database a bit, use some widgets to upload and display images, and we've got a perfectly usable little database system for handling photos:
import streamlit as st, sqlite3

con=sqlite3.connect('pics.db')
cur=con.cursor()
cur.execute('CREATE TABLE IF NOT EXISTS pics(id TEXT, img BLOB, note TEXT)')

st.title('Sqlite Images')
if st.button('Add New Image'):
  cur.execute('INSERT INTO pics(id, img, note) VALUES(?,?,?)', ('', '', ''))
  con.commit()

for row in cur.execute('SELECT rowid, id, img, note FROM pics ORDER BY id'):
  with st.expander(row[1]):
    with st.form(f'ID-{row[0]}', clear_on_submit=True):
      id=st.text_input('id', row[1])
      if row[2]:
        img=row[2]
        st.image(row[2])
      file=st.file_uploader('Image', ['png', 'jpg', 'gif', 'bmp'])
      if file:
        img=file.read()
      note=st.text_area('note', row[3])
      if st.form_submit_button('Submit'):
        cur.execute(
          'UPDATE pics SET id=?, img=?, note=? WHERE id=?;',
          (id, img, note, str(row[1]))
        )
        con.commit()
        st.experimental_rerun()
      if st.form_submit_button("Delete"):
        cur.execute(f'''DELETE FROM pics WHERE rowid="{row[0]}";''')
        con.commit()
        st.experimental_rerun()
The example above is basically the same program as in the previous section, with some widgets switched out to display and upload images, as well as the following few additional 'if' evaluations to display images, or not, according to whether an image has been uploaded yet:
if row[2]:
  img=row[2]
  st.image(row[2])
file=st.file_uploader('Image', ['png', 'jpg', 'gif', 'bmp'])
if file:
  img=file.read()
7.6 Working With Dates and Times - Calendar Database App
Here's one more variation on the previous example which demonstrates how to work with dates and times in SQL, how to format those values using the Python datetime library, and display/interact them using Streamlit input/display methods:
import streamlit as st, sqlite3, datetime
con=sqlite3.connect('calendar.db')
cur=con.cursor()
cur.execute('CREATE TABLE IF NOT EXISTS cal(date DATE, time TEXT, event TEXT)')

if st.button('Add New Event'):
  cur.execute(
    '''
      INSERT INTO cal(date, time, event) VALUES(?,?,?)
    ''', (datetime.date.today(), str(datetime.datetime.now().time()), '')
  )
  con.commit()
  st.write('Added to current calendar day/time')

selected_date=st.date_input('Date to View', label_visibility='hidden')
if selected_date:
  for row in cur.execute(
    f'''
      SELECT rowid, date, time, event
      FROM cal
      WHERE date = '{str(selected_date)}'
      ORDER BY time
    '''
  ):
    with st.expander(f'{row[2][:-6]} - {row[3]}'):
      with st.form(f'ID-{row[0]}'):
        date=st.date_input(
          'Date', datetime.datetime.strptime(row[1], '%Y-%m-%d').date()
        )
        time=st.time_input(
          'Time', datetime.datetime.strptime(row[2], '%H:%M:%S.%f').time()
        )
        event=st.text_area('Event', row[3])
        if st.form_submit_button('Save'):
          cur.execute(
            'UPDATE cal SET date=?, time=?, event=? WHERE date=? and time=?;',
            (date, str(time)+'.00', event, row[1], row[2])
          )
          con.commit() ; st.experimental_rerun()
        if st.form_submit_button("Delete"):
          cur.execute(f'DELETE FROM cal WHERE rowid="{row[0]}";')
          con.commit() ; st.experimental_rerun()


Notice that instead of ast.literal_eval(), the code above uses methods from Python's datetime library to convert data to/from values returned by SQL statements:
datetime.date.today()
str(datetime.datetime.now().time()
datetime.datetime.strptime(row[1], '%Y-%m-%d').date()
datetime.datetime.strptime(row[1], '%Y-%m-%d').date()
A quick Google search will provide endless tutorials about Python datetime methods, if you want to learn more.
8. Some More Typical Crud Layout Patterns, Columns and Single Forms
8.1 Moving Past Repeating Layouts With St.expander(), Using St.columns()
The st.expander() technique shown in the previous database examples is useful in many cases, but it can get unwieldy when there are many rows to display. And in the case of the image display, it's not convenient to make the user click a dropdown to see each individual image.
Here's an example using st.columns() to layout images and form widgets across the screen. This sort of design is useful for any sort of inventory display, or for other types of apps with scrolling repeated layouts, where each row of results has the same visual 'card' configuration. Imagine, for example, how Amazon and Ebay results are displayed - not necessarily in spreadsheet-like grids, but with a repeated visual layout design used to display each record in a result set:
import streamlit as st, sqlite3

con=sqlite3.connect('picscols.db')
cur=con.cursor()
cur.execute('CREATE TABLE IF NOT EXISTS pics(id TEXT, img BLOB, note TEXT)')

st.title('Sqlite Images')
if st.button('Add New Image'):
  cur.execute('INSERT INTO pics(id, img, note) VALUES(?,?,?)', ('', '', ''))
  con.commit()

for row in cur.execute('SELECT rowid, id, img, note FROM pics ORDER BY id'):
  with st.form(f'ID-{row[0]}', clear_on_submit=True):
    imgcol, notecol = st.columns([3, 2])
    id=notecol.text_input('id', row[1])
    note=notecol.text_area('note', row[3])
    if row[2]:
      img=row[2]
      imgcol.image(row[2])
    file=imgcol.file_uploader('Image', ['png', 'jpg', 'gif', 'bmp'])
    if file:
      img=file.read()
    if notecol.form_submit_button('Save'):
      cur.execute(
        'UPDATE pics SET id=?, img=?, note=? WHERE id=?;',
        (id, img, note, str(row[1]))
      )
      con.commit()
      st.experimental_rerun()
    if notecol.form_submit_button("Delete"):
      cur.execute(f'''DELETE FROM pics WHERE rowid="{row[0]}";''')
      con.commit()
      st.experimental_rerun()
Most of the code above is identical to the example in the previous section, with just a bit of refactoring to use column layouts. Notice particularly the line:
imgcol, notecol = st.columns([3, 2])That creates 2 display columns named 'imagecol' and 'notecol', with horizontal sizes in the ratio 3:2. Then, instead of using st.
(), . is used to place widgets in a given column. For example, the following line places an st.text_input() widget into the 'notecol' column, initially displaying the row[1] value selected from the database, and assigns the value entered by the user to the variable 'id':() id=notecol.text_input('id', row[1])'That is a lot of work accomplished by very little code!
Each of the repeating layouts in the example above could potentially be as arbitrarily complicated as you'd like. Simply include any layout you create in a 'for' loop, and you've got a beautifully simple and composable method for delivering scrolling repeated layouts in apps of all sorts.
8.2 Traditional Single Form Layouts
There are a few other display and layout patterns that are commonly used in various application situations. One of the most common layout patterns is to present a single form to display/edit row details, with a dropdown list widget used to select a particular row from the database.
In the code below, you'll find the same SQL queries used in the previous examples, but with a single form populated by the results of a single record selected from the database:
import streamlit as st, sqlite3, ast

con=sqlite3.connect('db.db')
cur=con.cursor()
cur.execute('CREATE TABLE IF NOT EXISTS db(name TEXT, letters TEXT, note TEXT)')

st.title('CRUD Single Form')
st.header("Create/Update/Delete")
names=[str(row[0]) for row in cur.execute(f"SELECT name FROM db;")]
names.insert(0, '')
name_to_update=st.selectbox('', names)
if name_to_update!='':
  createorupdate='update'
  row_to_update=cur.execute(
    f'''SELECT * FROM db WHERE name="{name_to_update}";'''
  ).fetchall()[0]
  nameval=row_to_update[0]
  lettersval=ast.literal_eval(row_to_update[1])
  noteval=row_to_update[2]
else:
  createorupdate='create'
  nameval=''
  lettersval=[]
  noteval=''
with st.form("Create or Update a Row of Data", clear_on_submit=True):
  name=st.text_input('Name', value=nameval)
  letters=st.multiselect('Letters', ['A', 'B', 'C'], default=lettersval)
  note=st.text_area('Notes', placeholder='Some Text', value=noteval)
  if st.form_submit_button("Submit"):
    if createorupdate=='create':
      cur.execute(
        '''
          INSERT INTO db(name, letters, note)
          VALUES(?,?,?)
        ''', (name, str(letters), note)
      )
      con.commit()
    else:
      cur.execute(
        '''
          UPDATE db
          SET name=?, letters=?, note=?
          WHERE name=?;
        ''', (name, str(letters), note, str(nameval))
      )
      con.commit()
      st.experimental_rerun()
  if st.form_submit_button("Delete"):
    cur.execute(f'''DELETE FROM db WHERE name="{name_to_update}";''')
    con.commit()
    st.write(f"{name_to_update} has been deleted")

In this example, the name values from each row of the database are populated into a selectbox, using a list comprehension on the rows returned by an SQL select query. An empty string is added to the results of the query (inserted at the 0 index), to enable users to create a new record:
names=[str(row[0]) for row in cur.execute(f"SELECT name FROM db;")]
names.insert(0, '')
name_to_update=st.selectbox('', names)
Note that the selectbox widget suggests a short autocomplete selection list, whenever a user begins to type a partial value. This is very helpful when the list of selectable items in a dropdown is large, so that users never need to scroll through an long list of items to find a particular value.
The rest of the code above uses SQL statements to create, update, and delete database records in the same way as previous examples. Several 'if' conditional evaluations are used to determine whether the contents of the form should be used to create a new record, or to update the existing displayed record:
name_to_update=st.selectbox('', names)
if name_to_update!='':
  createorupdate='update'
If the selected value in the dropdown is an empty string, then a new record is created. Otherwise, the displayed record is updated with changes entered by the user (this example uses the same verbatim SQL statements from earlier examples):
if createorupdate=='create':
  cur.execute(
    '''
      INSERT INTO db(name, letters, note)
      VALUES(?,?,?)
    ''', (name, str(letters), note)
  )
  con.commit()
else:
  cur.execute(
    '''
      UPDATE db
      SET name=?, letters=?, note=?
      WHERE name=?;
    ''', (name, str(letters), note, str(nameval))
  )
  con.commit()
  st.experimental_rerun()
8.3 Using Dataframe Grids to Display Database Contents
We can create a compact grid view of all database rows returned by an SQL query, using an st.dataframe() widget. St.dataframe() is meant to display Pandas dataframes, which can be easily generated from lists returned by database queries:
import streamlit as st, pandas as pd, sqlite3

con=sqlite3.connect('db.db')
cur=con.cursor()
cur.execute('CREATE TABLE IF NOT EXISTS db(name TEXT, letters TEXT, note TEXT)')
st.header("Read")

#### The following code assigns the variable 'myrows' to
#### the results of an SQL query:

if st.checkbox('Recheck to refresh display', value=True):
  myrows=[
    list(row) for row in cur.execute(
      '''
        SELECT rowid, name, letters, note
        FROM db
        ORDER BY name
      '''
    )
  ]

  ####  Here we create a dataframe from the 'myrows' list
  ####  generated by the SQL query above:

  st.dataframe(
    pd.DataFrame(
      myrows,
      columns=['rowid', 'name', 'letters', 'note']),
      height=800
  )

Notice the use of st.checkbox() to refresh the layout above. We'll cover how this works in more detail, in a later section entitled 'Streamlit Program Flow'.
The example below combines the previous form and dataframe displays into a side-by-side column layout:
import streamlit as st, pandas as pd, sqlite3, ast

con=sqlite3.connect('db.db')
cur=con.cursor()
cur.execute('CREATE TABLE IF NOT EXISTS db(name TEXT, letters TEXT, note TEXT)')

st.title('CRUD Single Form')
col1, col2=st.columns([2,3])
with col1:
  st.header("Create/Update/Delete")
  names=[str(row[0]) for row in cur.execute(f"SELECT name FROM db;")]
  names.insert(0, '')
  name_to_update=st.selectbox('', names)
  if name_to_update!='':
    createorupdate='update'
    row_to_update=cur.execute(
      f'''SELECT * FROM db WHERE name="{name_to_update}";'''
    ).fetchall()[0]
    nameval=row_to_update[0]
    lettersval=ast.literal_eval(row_to_update[1])
    noteval=row_to_update[2]
  else:
    createorupdate='create'
    nameval=''
    lettersval=[]
    noteval=''
  with st.form("Create or Update a Row of Data", clear_on_submit=True):
    name=st.text_input('Name', value=nameval)
    letters=st.multiselect('Letters', ['A', 'B', 'C'], default=lettersval)
    note=st.text_area('Notes', placeholder='Some Text', value=noteval)
    if st.form_submit_button("Submit"):
      if createorupdate=='create':
        cur.execute(
          '''
            INSERT INTO db(name, letters, note)
            VALUES(?,?,?)
          ''', (name, str(letters), note)
        )
        con.commit()
      else:
        cur.execute(
          '''
            UPDATE db
            SET name=?, letters=?, note=?
            WHERE name=?;
          ''', (name, str(letters), note, str(nameval))
        )
        con.commit()
        st.experimental_rerun()
    if st.form_submit_button("Delete"):
      cur.execute(f'''DELETE FROM db WHERE name="{name_to_update}";''')
      con.commit()
      st.write(f"{name_to_update} has been deleted")

with col2:
  st.header("Read")
  if st.checkbox('Recheck to refresh display', value=True):
    myrows=[
      list(row) for row in cur.execute(
        '''
          SELECT rowid, name, letters, note
          FROM db
          ORDER BY name
        '''
      )
    ]
    st.dataframe(
      pd.DataFrame(
        myrows,
        columns=['rowid', 'name', 'letters', 'note']),
        height=800
    )

9. More Simple Example Apps to Demonstrate Streamlit Basics in Practice
This section of the tutorial consists of a variety of simple application examples. Some are trivial, but all together they demonstrate how to compose common building blocks needed to implement functionalities used in many common sorts of applications.
You'll see that the majority of apps in this section require just a few lines of Streamlit code, to implement user input and displayed output. Most of the code is otherwise generic Python, used to perform calculations, list manipulations, conditional evaluations, loops, CRUD operations, etc.
9.1 Time Between Dates
This example computes the number of days between 2 dates entered by the user. It uses two st.date_input() widgets, and displays calculated results with st.write():
import streamlit as st

start=st.date_input('Start Date')
end=st.date_input('End Date')
if start and end:
 st.write(end-start)


9.2 Live Webcam Viewer
This app allows the user to view live images from a number of online cameras. St.selectbox() and st.image() are the only widgets needed:
import streamlit as st

cam=st.selectbox(
  'Choose a Cam',
  [
    '',
    'pitriverbridge/pitriverbridge.jpg',
    'johnsongrade/johnsongrade.jpg',
    'perez/perez.jpg',
    'mthebron/mthebron.jpg',
    'eurekaway/eurekaway.jpg',
    'sr70us395/sr70us395.jpg',
    'bogard/bogard.jpg',
    'eastriverside/eastriverside.jpg',
  ]
)
if cam:
  st.image('https://cwwp2.dot.ca.gov/data/d2/cctv/image/' + cam)


9.3 Coin Flip
This app uses the st.experimental_rerun() method to reload the page whenever the button is clicked:
import streamlit as st, random, time

time.sleep(1)
coins = ['http://re-bol.com/heads.jpg', 'http://re-bol.com/tails.jpg']
coin = random.choice(coins)
st.image(coin)
if st.button('Flip'):
  st.experimental_rerun()

9.4 Word Count
This example simply splits text entered into an st.text_area() widget, and displays a count of the values in that list, using the st.write() widget:
import streamlit as st
text = st.text_area('Type or paste some  text')
if text:
  words = text.split()
  st.write(f'Number of words in your text:\n\n{len(words)}')

9.5 Pig Latin Generator
Again, the only Streamlit widgets needed here are st.text_area() and st.write(). The rest is just generic Python which splits up and recomposes characters from the string of words entered by the user:
import streamlit as st

text = st.text_area('Type or paste some  text')
if text:
  word_list = text.split(' ')
  pig_latin = ' '
  for word in word_list:
    if word.isalpha():
      pigword = word[1:] + word[0] + 'ay'
      pig_latin = pig_latin + pigword + ' '
    else:
      pig_latin += word
  st.write(pig_latin.strip(' '))

9.6 Calculator
Here's a toy GUI calculator built with st.button() widgets. It's only purpose is to demonstrate a bit more about visual layout and the use of columns, as well as program flow and the use of st.session_state() to store variable values:
import streamlit as st, ast

if 'total' not in st.session_state:
  st.session_state.total=''
if st.button('Clear'): st.session_state.total=''
col1, col2, col3, col4, col5=st.columns([1,1,1,1,4])
if col1.button('1'): st.session_state.total+='1'
if col2.button('2'): st.session_state.total+='2'
if col3.button('3'): st.session_state.total+='3'
if col4.button('+'): st.session_state.total+='+'
if col1.button('4'): st.session_state.total+='4'
if col2.button('5'): st.session_state.total+='5'
if col3.button('6'): st.session_state.total+='6'
if col4.button('-'): st.session_state.total+='-'
if col1.button('7'): st.session_state.total+='7'
if col2.button('8'): st.session_state.total+='8'
if col3.button('9'): st.session_state.total+='9'
if col4.button('.'): st.session_state.total+='.'
if col1.button('0'): st.session_state.total+='0'
if col2.button('*'): st.session_state.total+='*'
if col3.button('/'): st.session_state.total+='/'
if col4.button('='):
  st.session_state.total=str(eval(st.session_state.total))
st.text_input('Result', st.session_state.total)

9.7 Dynamically Generated Mad Libs
With this app, you can see the st.checkbox() widget, which is used here as something similar to an st.button(), but which saves its selected state on each re-run (True, as long as the checkbox is checked). This example also demonstrates how to dynamically generate a variable number of form input widgets, using a 'for' loop, based on the number values required to display a given madlib:
import streamlit as st, random

if 'madlibText' not in st.session_state:
  st.session_state.madlibText = ''
st.write(st.session_state.madlibText)
allLines = [
  "person,place,time#I went to the %2 with %1 at %3",
  "object,person#A %1 flew into %2's face.",
  "color,pluralnoun, celebrity#Roses are %1, %2 are blue.  I love %3"
]
madlib = random.choice(allLines)
halves = madlib.split("#")
madlibText = halves[1]
inputs = halves[0].split(",")
inputStore = [""]
with st.form("id"):
  widgets=''
  for item in inputs:
    widgets+=f'{item}=st.text_input("Enter a {item}") ; '
  exec(widgets)
  if st.form_submit_button("Submit"):
    code=''
    for item in inputs:
      code+=f'inputStore.append({item})\n'
    exec(code)
    for i in range(len(inputStore)):
      madlibText = madlibText.replace("%"+str(i), inputStore[i])
      madlibText = madlibText.strip()
    st.session_state.madlibText = madlibText
    st.write(st.session_state.madlibText)

9.8 Markdown Editor
Here's a simple editor which allows the user to enter text with markdown tags into an st.text_area() widget, and displays the visual result using an st.markdown() widget:
import streamlit as st
code=st.text_area('Markdown Code')
if code:
  st.markdown(code)

That was too easy. Let's add some code that allows the user to edit and save any number of markdown documents to a database. This is just a slight variation of the repeating form CRUD database example you've seen earlier, with the addition of a markdown widget to render selected documents:
import streamlit as st, sqlite3
con=sqlite3.connect('markdown.db')
cur=con.cursor()
cur.execute('CREATE TABLE IF NOT EXISTS db(name TEXT, code TEXT)')

if st.button('Add New Row'):
  cur.execute('INSERT INTO db(name, code) VALUES(?,?)', ('',''))
  con.commit()

for row in cur.execute('SELECT rowid, name, code FROM db ORDER BY name'):
  with st.form(f'ID-{row[0]}'):
    name=st.text_input('Name', row[1])
    code=st.text_area('Code', row[2])
    if st.form_submit_button('Save and View'):
      cur.execute(
        'UPDATE db SET name=?, code=? WHERE rowid=?;',
        (name, code, str(row[0]))
      )
      con.commit() ; st.experimental_rerun()
    if st.form_submit_button("Delete"):
      cur.execute(f'DELETE FROM db WHERE rowid="{row[0]}";')
      con.commit() ; st.experimental_rerun()
    st.markdown(code)

9.9 Chat Room (With Message Data Saved to Text File)
Here's a trivial bare bones chat room app. Users type their name and a message, and that info is posted to be read and responded to by any other users running the app. A time stamp is also added to each post.
Be aware that in this example, message posts are written to a single file, so if any users were to try and write to the file at the exact same instant, there's a possibility that the file could be corrupted. So, this example is only intended to demonstrate some simple Streamlit interface patterns - not for production use. Two tutorial examples following this will build on the basic design here, but will save messages to a database, so that it's better suited for production use.
Notice the 'label_visibility' argument used in the st.text_area() method, which hides the default label above the text widget. Besides that, a few st.column(), st.text_input(), st.form(), st.form_submit_button(), and st.experimental_rerun() methods are all the Streamlit code needed to make this app work:
import streamlit as st, datetime
# import os ; os.remove('chat.txt')
# Uncomment the line above to delete the file containing
# all messages, and start over with a fresh chat room.

col1, col2=st.columns([2,3])
with col2:
  with open('chat.txt', 'a+') as file: pass
  with open('chat.txt', 'r+') as file:
    msg=file.read()
    st.text_area('msg', msg, height=350, label_visibility='collapsed')

with col1:
  with st.form('New Message', clear_on_submit=True):
    name=st.text_input('Name')
    message=st.text_area('Message')
    timestamp=datetime.datetime.now()
    if st.form_submit_button('Add Message'):
      newmsg=f'---  {name}   {timestamp}\n\n{message}\n\n{msg}'
      with open('chat.txt', 'w') as file:
        file.write(newmsg)
      st.experimental_rerun()

9.10 Chat Room (With Message Data Saved to Sqlite Database)
This example builds upon the basic structure of the previous chat example, but saves data to a single field in a database table, so that it's better suited to production use. For real production environments, apps that build upon these simple models are best migrated from Sqlite to any multi-user database system such as PostgreSQL, MySQL, MSSQL, etc.
Most of the SQL commands in this version of the chat app should be familiar from previous examples.
Notice the commented end of the first line. Simply un-comment that part of the line and run the app again, in order to completely delete the database and start fresh (that will cause all saved messages to be permanently erased):
import streamlit as st, sqlite3, datetime#, os ; os.remove('chats.db')
con=sqlite3.connect('chats.db')
cur=con.cursor()
cur.execute('CREATE TABLE IF NOT EXISTS db(messages TEXT)')

col1, col2=st.columns([2,3])
with col2:
  msg=cur.execute('SELECT messages FROM db').fetchone()
  if msg==None:
    cur.execute('INSERT INTO db(messages) VALUES ("")')
    con.commit()
  st.text_area('msg', msg[0], height=350, label_visibility='collapsed')
with col1:
  with st.form('New Message', clear_on_submit=True):
    name=st.text_input('Name')
    message=st.text_area('Message')
    timestamp=datetime.datetime.now()
    if st.form_submit_button('Add Message'):
      newmsg=f'---  {name}   {timestamp}\n\n{message}\n\n{msg[0]}'
      cur.execute(
        'UPDATE db SET messages=? WHERE rowid=?;',
        (newmsg, 1)
      )
      con.commit()
      st.experimental_rerun()

9.11 Multiple Topic (Multi-Room) Chat
This example builds more upon the previous two examples, to expand the chat example so that users can communicate within multiple chat threads, all in the same interface (a lot like a simple web forum):
import streamlit as st, sqlite3, datetime #, os ; os.remove('forum.db')
con=sqlite3.connect('forum.db')
cur=con.cursor()
cur.execute('CREATE TABLE IF NOT EXISTS db(topic TEXT, messages TEXT)')

# st.set_page_config(layout="wide", page_title="Forum")

for row in cur.execute('SELECT rowid, topic, messages FROM db'):
  st.subheader(row[1])
  with st.expander(''):
    col1, col2=st.columns([3,2])
    with col1:
      st.text_area('topic', row[2], height=350, label_visibility='collapsed')
    with col2:
      with st.form(f'ID{row[0]}', clear_on_submit=True):
        name=st.text_input('Name')
        timestamp=datetime.datetime.now()
        message=st.text_area('Message')
        if st.form_submit_button('Submit'):
          messages=f'{name} - {timestamp}:\n\n{message}\n\n{row[2]}\n\n'
          cur.execute(
            'UPDATE db SET topic=?, messages=? WHERE rowid=?;',
            (row[1], messages, str(row[0]))
          )
          con.commit() ; st.experimental_rerun()

st.header('Add New Topic')
with st.form('New Topic', clear_on_submit=True):
  topic=st.text_input('New Topic')
  name=st.text_input('Name')
  messages=st.text_area('Initial Mesage')
  timestamp=datetime.datetime.now()
  if st.form_submit_button('Add New Topic'):
    cur.execute('INSERT INTO db(topic, messages) VALUES(?,?)', (
      topic, f'{name} - {timestamp}:\n\n{messages}\n\n'
    ))
    con.commit() ; st.experimental_rerun()

9.12 Minimal Cash Register
This is a smallest possible bare bones prototype example of a retail cash register checkout app. This first version doesn't save any receipts. It's just a simple screen layout that displays items entered for purchase, and computes subtotal, tax, and total sales calculations.
Note that this app, and all the other examples in the text, are meant only to demonstrate Streamlit code patterns - not for production use:
import streamlit as st, datetime

if 'purchased' not in st.session_state:
  st.session_state.purchased=[]
with st.form('Add Item', clear_on_submit=True):
  itmcol, prccol, btncol=st.columns([6,2,1])
  item=itmcol.text_input('Item', placeholder='item', label_visibility='collapsed')
  price=prccol.number_input('Price', label_visibility='collapsed')
  if btncol.form_submit_button('Add'):
    timestamp=datetime.datetime.now()
    st.session_state.purchased.append({'item': item, 'price': price})
    st.markdown('---')
    itemcol, pricecol=st.columns([4,1])
    subtotal=0
    for itm in st.session_state.purchased:
      itemcol.write(itm['item'])
      pricecol.write(itm['price'])
      subtotal += (itm['price'])
    st.markdown('---')
    plccol, lblcol, numcol=st.columns([3,1,1])
    lblcol.write('Subtotal')
    numcol.write('{:.2f}'.format(subtotal))
    lblcol.write('Tax')
    numcol.write('{:.2f}'.format(subtotal* .06))
    lblcol.write('Total')
    numcol.write('{:.2f}'.format(subtotal * 1.06))

9.13 Cash Register Part Two: Saving Receipts & Generating Sales Reports
To add the capability to save receipts generated by the cash register app, we'll add some familiar SQL commands which save and retrieve items sold during each sales transaction, along with a timestamp marking when each receipt was saved. We'll save the list of sold items in each receipt, and the timestamp - both as strings in an Sqlite database table, as you've seen in previous examples.
To generate sales reports, we'll use ast.literal_eval() to de-serialize the list structure containing sold items in each sales receipt. We'll use the datetime library to evaluate start and end date ranges for each report, and simply add up all sold items in each selected receipt, to generate the sales total computation:
import streamlit as st, datetime, sqlite3, ast#, os ; os.remove('sales.db')

con=sqlite3.connect('sales.db')
cur=con.cursor()
cur.execute('CREATE TABLE IF NOT EXISTS sales(items TEXT, timestamp TEXT)')
if 'purchased' not in st.session_state:
  st.session_state.purchased=[]
with st.form('Add Item', clear_on_submit=True):
  itmcol, prccol, btncol=st.columns([6,2,1])
  item=itmcol.text_input('Item', placeholder='item', label_visibility='collapsed')
  price=prccol.number_input('Price', label_visibility='collapsed')
  if btncol.form_submit_button('Add'):
    timestamp=datetime.datetime.now()
    st.session_state.purchased.append({'item': item, 'price': price})
    st.markdown('---')
    itemcol, pricecol=st.columns([4,1])
    subtotal=0
    for itm in st.session_state.purchased:
      itemcol.write(itm['item'])
      pricecol.write(itm['price'])
      subtotal += (itm['price'])
    st.markdown('---')
    plccol, lblcol, numcol=st.columns([3,1,1])
    lblcol.write('Subtotal')
    numcol.write('{:.2f}'.format(subtotal))
    lblcol.write('Tax')
    numcol.write('{:.2f}'.format(subtotal* .06))
    lblcol.write('Total')
    numcol.write('{:.2f}'.format(subtotal * 1.06))
if st.button('Save'):
  if st.session_state.purchased==[]:
    st.markdown('**Nothing to save on this receipt**')
  else:
    cur.execute('INSERT INTO sales(items, timestamp) VALUES(?,?)', (
      str(st.session_state.purchased), str(datetime.datetime.now())
    ))
    con.commit()
    st.session_state.purchased=[]
    st.markdown('**RECEIPT SAVED**')
with st.form('Report', clear_on_submit=True):
  date1=st.date_input('Start Date')
  date2=st.date_input('End Date')
  if st.form_submit_button('Generate Sales Report'):
    sales_total = 0
    for row in cur.execute('''
      SELECT rowid, items, timestamp FROM sales ORDER BY timestamp
    '''):
      saledate=datetime.datetime.strptime(row[2], '%Y-%m-%d %H:%M:%S.%f').date()
      if (
          saledate >= date1 and
          saledate <= date2
        ):
        for item in ast.literal_eval(row[1]):
         sales_total += item['price']
    st.write(sales_total)


9.14 Shift Clock
This app provides a button for users to clock in and clock of work shifts. Note that this app, and all the other examples in the text, are meant only to demonstrate Streamlit code patterns - not for production use.:
import streamlit as st, ast, datetime, sqlite3
con=sqlite3.connect('shifts.db')
cur=con.cursor()
cur.executescript('''
  CREATE TABLE IF NOT EXISTS employees(name TEXT);
  CREATE TABLE IF NOT EXISTS shifts(name TEXT, login TEXT, logout TEXT);
''')
con.commit()

st.header('Shift Clock')
names=[str(row[0]) for row in cur.execute('SELECT name FROM employees')]
selected_name=st.selectbox('Pick Employee', names)

if st.button('Log In'):
  cur.execute(
    'INSERT INTO shifts(name,login) VALUES(?,?)',
    (selected_name, str(datetime.datetime.now()))
  )
  con.commit()
  st.write('Logged In')

if st.button('Log Out'):
  cur.execute(
    'INSERT INTO shifts(name,logout) VALUES(?,?)',
    (selected_name, str(datetime.datetime.now()))
  )
  con.commit()
  st.write('Logged Out')

st.subheader('Calculate Hours for Selected Employee')
date1=st.date_input('Start Date')
date2=st.date_input('End Date')
if st.button('Calculate Hours') and date1 and date2:
  total_hours = 0
  startdate = 0
  logins = []
  logouts = []
  for row in cur.execute('SELECT name, login, logout FROM shifts'):
    if row[1] is not None:
      login=datetime.datetime.strptime(row[1], '%Y-%m-%d %H:%M:%S.%f')
    else:
      login=None
    if row[2] is not None:
      logout=datetime.datetime.strptime(row[2], '%Y-%m-%d %H:%M:%S.%f')
    else:
      logout=None
    if row[0]==selected_name:
      if logout is None:
        if login >= datetime.datetime.combine(date1, datetime.time(0, 0)):
          logins.append(login)
        startdate = login
      else:
        if logout <= datetime.datetime.combine(date2, datetime.time(0, 0)):
          logouts.append(logout)
        if total_hours == 0:
          total_hours = (logout - startdate)
        else:
          total_hours += (logout - startdate)
  st.write(f'Total Hours: {total_hours}')

st.subheader('Create New Employee')
new_employee=st.text_input('New Employee Name')
if st.button('Add New Employee'):
  cur.execute('INSERT INTO employees(name) VALUES(?)',(str(new_employee),))
  con.commit()
  st.write(f'Added {new_employee}!')
  st.experimental_rerun()


9.15 FTP File Manager
This app enables users to download and upload files from/to FTP server accounts, using saved login information for each server. Users pick from a list of pre-defined servers to log into and choose selected files to download. Selected files from a local hard drive can also be uploaded to a chosen server:
import streamlit as st, ftplib, os

servers = {
  'account1' : ['myaccounturl1.com', 'username1', 'password1', '/myfolder'],
  'account2' : ['myaccounturl2.com', 'username2', 'password2', '/public_html'],
  'account3' : ['myaccounturl3.com', 'username3', 'password3', '/afolder']
}

if 'files' not in st.session_state:
  st.session_state.files=[]

def list_ftp_files(FTP_HOST, FTP_USER, FTP_PASS, FTP_FOLDER):
  ftp = ftplib.FTP(FTP_HOST, FTP_USER, FTP_PASS)
  ftp.encoding = "utf-8"
  ftp.cwd(FTP_FOLDER)
  files = ftp.nlst()
  ftp.quit()
  return files

def download_ftp_file(FTP_HOST, FTP_USER, FTP_PASS, FTP_FOLDER, FTP_FILENAME):
  ftp = ftplib.FTP(FTP_HOST)
  ftp.login(FTP_USER, FTP_PASS)
  ftp.cwd(FTP_FOLDER)
  try:
    ftp.retrbinary("RETR " + FTP_FILENAME , open(FTP_FILENAME, 'wb').write)
  except:
    st.write("Error downloading")
  with open(FTP_FILENAME, 'r+') as file:
    return file.read()

def upload_ftp_file(
  FTP_HOST,
  FTP_USER,
  FTP_PASS,
  FTP_FOLDER,
  FTP_FILENAME,
  file
):
  ftp = ftplib.FTP(FTP_HOST)
  ftp.login(FTP_USER, FTP_PASS)
  ftp.cwd(FTP_FOLDER)
  with open(FTP_FILENAME, "wb") as binary_file:
    binary_file.write(file)
  with open(FTP_FILENAME, 'rb') as myfile:
    try:
      ftp.storbinary("STOR " + FTP_FILENAME, myfile)
    except:
      st.write('Error uploading')

serverlist=[key for key in servers.keys()]
selected_server=st.selectbox('Select a Server', serverlist)
if selected_server:
  if selected_server!=' ':
    login = servers[selected_server]
    FTP_HOST = login[0]
    FTP_USER = login[1]
    FTP_PASS = login[2]
    FTP_FOLDER = login[3]
    st.session_state.files = list_ftp_files(
      FTP_HOST,
      FTP_USER,
      FTP_PASS,
      FTP_FOLDER
    )
    for i in ['.', '..']:
      st.session_state.files.remove(i)
    st.session_state.files.insert(0, ' ')

uploaded_file = st.file_uploader('Upload File')
if uploaded_file:
  login = servers[selected_server]
  FTP_HOST = login[0]
  st.write('Upload Complete, Close File Name to Update Selection List')
  FTP_USER = login[1]
  FTP_PASS = login[2]
  FTP_FOLDER = login[3]
  FTP_FILENAME = uploaded_file.name
  file = upload_ftp_file(
    FTP_HOST,
    FTP_USER,
    FTP_PASS,
    FTP_FOLDER,
    FTP_FILENAME,
    uploaded_file.getvalue()
  )

selected_file=st.selectbox('Select File to Download', st.session_state.files)
if selected_file and selected_file!=' ':
  login = servers[selected_server]
  FTP_HOST = login[0]
  FTP_USER = login[1]
  FTP_PASS = login[2]
  FTP_FOLDER = login[3]
  FTP_FILENAME = selected_file
  file = download_ftp_file(
    FTP_HOST,
    FTP_USER,
    FTP_PASS,
    FTP_FOLDER,
    FTP_FILENAME
  )
  st.download_button('Download', file, file_name=selected_file)

10. Installing and Running Streamlit on a Local Computer
So far, we've used the convenient online editor at livecode.streamlitapp.com to explore Streamlit features.
For production use, Streamlit takes a just few minutes to set up locally on most modern computers, and it can be self-hosted using any well known cloud service provider, with or without Docker containers (or you can host apps for free on Streamlit's cloud service).
To begin using Streamlit on your own local PC, you'll need a 64 bit version of Python from python.org installed, running on a 64 bit operating system. When you have Python installed, run 'pip install streamlit' at your OS command line (run 'cmd' in Windows, or the Terminal on a Mac to access the command line):

After the pip install process has completed, you can check that Streamlit is running by executing 'streamlit hello' at the command prompt. Streamlit should open the browser by default to http://localhost:8501, where you'll seed the demo app running:

To create your first Streamlit app, you can use any text editor to create a new text file. Using an IDE such as Microsoft Visual Studio Code (free from https://code.visualstudio.com/Download) can provide helpful code auto-completion, plus useful project management and integrated execution features, but even Notepad can be used to begin editing Streamlit apps. Start by saving the following code to a new file named 'streamlit1.py':
import streamlit as st
if st.button('Say Hello'):
  st.write('Hello World!')
At your command line, navigate to the folder where you've saved streamlit1.py. For example, if you've saved streamlit1.py in your Documents folder, type 'CD documents' (if you've never used the 'CD' command in your computer's console, you can find plenty of tutorials with a quick Google search):
You can type 'dir' at the command line to display a listing of the files in the current folder, to ensure that you're in the correct folder. Now type 'streamlit run streamlit1.py', and your browser will open, displaying the web app created by the code above. Click the 'Say Hello' button, and the app will greet you with the 'Hello World!' message.
Back in the console window, you'll see that 2 addresses are provided for the app. The first address is the 'http://localhost:8501', which is the address you can use to view the app, on the machine where Streamlit is running. The second address contains the IP address of the computer on which the Streamlit app is running. You can type that URL into the address bar in any modern browser on any computer or mobile phone/tablet attached to your local area WIFI network, and you'll see the app run on that device. Streamlit automatically adjusts layouts responsively, so that they display properly on mobile and desktop machines without any code changes. If you have a mobile device or another computer connected to your WIFI network, test your app. When you're done, you can close the Streamlit app server by focusing the command line window and pressing the CTRL + C keys on your keyboard.

Next, try running any of the CRUD database examples, or an API app example from earlier in the tutorial. Just type 'streamlit run
' to run the Streamlit code, using any filename you create. Streamlit can be used like this, running on a local area network, for users who prefer to run internal applications with sensitive files stored only on on-house machines. Running a local installation also provides a simple setup for the development cycle, before posting apps online.
It should be noted that whenever you change the source file of a Streamlit app, the app will detect the change to the source code, and ask the user if the app should be rerun with the new code. This makes the debugging and creative cycles move much quicker, without any external tools besides Streamlit required. Simply edit your Streamlit code, keep your app running in a browser, select 'always rerun' in the app, and the running application will refresh automatically every time you save changes to the code:

11. Multi-Page Streamlit Sites
There are several ways to build Streamlit apps with multiple screens of information.
11.1 Using Containers and St.Sidebar()
Any Streamlit widget can be placed in a sidebar layout using the syntax: st.sidebar.
(). This is useful for easily creating multiple screen layouts withing a single simple script: import streamlit as st, numpy as np, pandas as pd menu=st.sidebar.selectbox('Menu', ['Page 1', 'Page 2', 'Page 3']) if menu=='Page 1': st.header('Page 1') df=pd.DataFrame(np.random.randn(10,5),columns=('c %d'% i for i in range(5))) st.table(df) if menu=='Page 2': st.header('Page 2') st.json({'foo':'bar','baz':'boz','stuff':['stuff 1','stuff 2']}) if menu=='Page 3': st.header('Page 3')


11.2 True Multi-Page Apps From Multiple Scripts
To create actual multi-page sites made up of multiple scripts, see:
https://blog.streamlit.io/introducing-multipage-apps/
https://docs.streamlit.io/library/get-started/multipage-apps
12. Using FastAPI to Serve Data Manipulated by Streamlit Apps
Modern web apps commonly communicate via HTTP (Rest) API calls. You can use a library such as FastAPI to read and write data to the same database that your Streamlit apps connect to. This functionality enables apps created in any programming language to interact with your Streamlit apps.
Here's a simple example which demonstrates how to use FastAPI to serve data which has been created by the Streamlit database example in the previous section of the tutorial. Just put it in the same folder as the Streamlit code:
import sqlite3
con=sqlite3.connect('db.db')
cur=con.cursor()

import uvicorn
from fastapi import FastAPI
app = FastAPI()

@app.get("/{col}")
async def get_col(col: str):
  return [row for row in cur.execute(f"SELECT {col} FROM db;")]

if __name__ == '__main__':
  uvicorn.run(app, host='0.0.0.0', port=8000)
Go to http://localhost:8000/* in your browser, and you'll see all the rows of the database, returned by the API in json format. Go to http://localhost:8000/name , http://localhost:8000/letters , or http://localhost:8000/note , and you'll see the selected columns of the database returned. The json generated by this FastAPI code can be consumed by any web framework, to allow apps written on any platform to interoperate and share data easily.
The example below incorporates both the Streamlit code and the FastAPI code into a single script, and allows the user to run the FastAPI server directly from the Streamlit interface (currently configured for Windows OS). This is truly a full stack solution, with user interface, database, and API interface, in less than 50 lines of code:
import streamlit as st, sqlite3, ast
con=sqlite3.connect('db.db')
cur=con.cursor()
cur.execute('CREATE TABLE IF NOT EXISTS db(name TEXT, letters TEXT, note TEXT)')

if st.button('Add New Row'):
  cur.execute('INSERT INTO db(name, letters, note) VALUES(?,?,?)', ('','[]',''))
  con.commit()

for row in cur.execute('SELECT rowid, name, letters, note FROM db ORDER BY name'):
  with st.expander(row[1]):
    with st.form(f'ID-{row[0]}', clear_on_submit=True):
      name=st.text_input('Name', row[1])
      letters=st.multiselect('letters', ['A', 'B', 'C'], ast.literal_eval(row[2]))
      note=st.text_area('Note', row[3])
      if st.form_submit_button('Save'):
        cur.execute(
          'UPDATE db SET name=?, letters=?, note=? WHERE name=?;',
          (name, str(letters), note, str(row[1]))
        )
        con.commit()
        st.experimental_rerun()
      if st.form_submit_button("Delete"):
        cur.execute(f'DELETE FROM db WHERE rowid="{row[0]}";')
        con.commit()
        st.experimental_rerun()

apicode='''import sqlite3
con=sqlite3.connect('db.db')
cur=con.cursor()
import uvicorn
from fastapi import FastAPI
app = FastAPI()
@app.get("/{col}")
async def get_col(col: str):
  return [row for row in cur.execute(f"SELECT {col} FROM db;")]
if __name__ == '__main__':
  uvicorn.run(app, host='0.0.0.0', port=8000)'''

if st.button('Run Web API'):
  with open("api.py", "w") as file: file.write(apicode)
  import os ; os.system('start cmd /K python api.py')
  st.markdown(f"""[View API](http://localhost:8000/*) If the API
  doesn't start, run 'python api.py' in your OS console & browse
  localhost:8000/*""", unsafe_allow_html=True)
13. Page Configuration
Streamlit allows you to set some page layout parameters with st.set_page_config():
st.set_page_config(page_title="Sqlite Images", layout="wide")St.set_page_config() must be the first Streamlit method used in an app, and it can only be set one time in each app. Note that st.set_page_config() will not run in the livecode editor used in this tutorial because that method is already included in the editor code.
To make other layout adjustments to your app, you can include CSS styling in an st.markdown() widget, with the 'unsafe_allow_html' argument set to True. The following CSS hides the default 'Made With Streamlit' link (at the bottom of the page) and hamburger menu (upper right hand corner) in apps, and removes the default empty space at the top of apps. This can be useful when producing public facing apps:
st.markdown(
  '''<style>
    #MainMenu{visibility: hidden;} footer{visibility: hidden;}
    #root>div:nth-child(1)>div>div>div>div>section>div{padding-top: .2rem;
  </style>''', unsafe_allow_html=True
)


Here's a bigger version of the previous single form CRUD example, where the wider layout is useful:
import streamlit as st, pandas as pd, sqlite3, ast

# st.set_page_config(layout="wide", page_title="Sqlite CRUD")
# uncomment the line above if running outside the livecode editor

st.markdown(
  '''<style>
    #MainMenu{visibility: hidden;} footer{visibility: hidden;}
    #root>div:nth-child(1)>div>div>div>div>section>div{padding-top: .2rem;
  </style>''', unsafe_allow_html=True
)

con=sqlite3.connect('crud.db')
cur=con.cursor()
cur.execute(
  '''
    CREATE TABLE IF NOT EXISTS crud (
      namecol TEXT,
      passwordcol TEXT,
      agecol TEXT,
      giftcol TEXT,
      colorcol TEXT,
      lettercol TEXT,
      notescol TEXT
    )
  '''  # key_col INTEGER NOT NULL PRIMARY KEY,
)

st.title('CRUD Example')
col1, col2=st.columns([2,3])
with col1:
  st.header("Create/Update/Delete")
  names=[
    str(row[0]) for row in cur.execute(
      f"SELECT namecol FROM crud;"
    )
  ]
  names.insert(0, '')
  name_to_update=st.selectbox('', names)
  if name_to_update!='':
    createorupdate='update'
    row_to_update=cur.execute(
      f'SELECT * FROM crud WHERE namecol="{name_to_update}";'
    ).fetchall()[0]
    nameval=row_to_update[0]
    passval=row_to_update[1]
    ageval=int(row_to_update[2])
    giftval=row_to_update[3]
    colorval=row_to_update[4]
    lettersval=ast.literal_eval(row_to_update[5])
    notesval=row_to_update[6]
  else:
    createorupdate='create'
    nameval=''
    passval=''
    ageval=30
    giftval=''
    colorval=None
    lettersval=[]
    notesval=''
  with st.form("Create or Update a Row of Data", clear_on_submit=True):
    name=st.text_input('Name', value=nameval)
    password=st.text_input('Password', type='password', value=passval)
    age=st.number_input(
      'Age', min_value=1, max_value=120, value=ageval, step=1
    )
    gifts=['roses', 'jewelry', 'dinner', 'trip', 'money']
    if giftval!='':
      chosengift=gifts.index(giftval)
    else:
      chosengift=0
    gift=st.selectbox('Gift', gifts, index=chosengift)
    colors=['red', 'green', 'blue', 'black']
    if colorval!=None:
      chosencolor=colors.index(colorval)
    else:
      chosencolor=0
    color=st.radio('Color', colors, index=chosencolor)
    letters=st.multiselect(
      'Letters', ['A', 'B', 'C', 'D'], default=lettersval
    )
    notes=st.text_area('Notes', placeholder='Some Text', value=notesval)
    if st.form_submit_button("Submit"):
      if createorupdate=='create':
        cur.execute(
          '''
            INSERT INTO crud(
              namecol,
              passwordcol,
              agecol,
              giftcol,
              colorcol,
              lettercol,
              notescol
            )
            VALUES(?,?,?,?,?,?,?)
          ''', (name, password, age, gift, color, str(letters), notes)
        )
        con.commit()  # con.close()
      else:
        cur.execute(
          '''
            UPDATE crud
            SET namecol = ? ,
                passwordcol = ? ,
                agecol = ? ,
                giftcol = ? ,
                colorcol = ? ,
                lettercol = ? ,
                notescol = ?
            WHERE namecol = ?;
          ''', (
            name,
            password,
            age,
            gift,
            color,
            str(letters),
            notes,
            str(nameval)
          )
        )
        con.commit()  # con.close()
        st.experimental_rerun()
    if st.form_submit_button("Delete"):
      cur.execute(
        f'''DELETE FROM crud WHERE namecol="{name_to_update}";'''
      )
      con.commit()
      st.write(f"{name_to_update} has been deleted")

with col2:
  st.header("Read")
  if st.checkbox('Recheck to refresh display', value=True):
    myrows=[
      list(row) for row in cur.execute(
        '''
          SELECT
            rowid,
            namecol,
            passwordcol,
            agecol,
            giftcol,
            colorcol,
            lettercol,
            notescol
          FROM crud
          ORDER BY namecol
        '''
      )
    ]
    st.dataframe(
      pd.DataFrame(
        myrows,
        columns=[
          'rowid',
          'name',
          'password',
          'age',
          'gift',
          'color',
          'letters',
          'notes'
        ]
      ),
      height=800
    )

14. Where To Go From Here
14.1 Streamlit Documentation, Blog, and Forum
API documentation and example code for all the widgets and features available in Streamlit, as well as tutorials and information about hosting with Streamlit cloud, are all available at:
The Blog is a great way to keep up with new features (Streamlit is evolving quickly!):
The Streamlit community forum is a great place to search for answers and to questions:
14.2 Streamlit Components
Streamlit's community has created some extremely powerful third party components. The aggrid component is a Streamlit port of the well known JavaScript grid, which provides many features not available in Streamlit's native st.dataframe() widget:
https://pablocfonseca-streamlit-aggrid-examples-example-jyosi3.streamlitapp.com/
The WebRTC Component is useful if you want to do any sort of video processing. There's even a full featured video-conference app built with it in just a few line of code:
https://webrtc.streamlitapp.com/
The User Authentication component is useful when you want to provide username and password login features to an app.
towardsdatascience authentication tutorial
And there are many more:
15. About the Author
Nick Antonaccio has been writing software code since 1979. Google 'learn rebol', 'learn livecode', 'learn ns basic', 'learn python anvil', 'jslinb', 'learn rfo', 'learn haxe', 'learn red programming', 'etsy api tutorial', 'business programming', and you'll see sites by Nick among the first results in every category. Nick has written mission critical software for large corporations and hundreds of small businesses. His Merchant's Village consignment software has been used to sell tens of millions of products at brick and mortar retail locations (search 'open source consignment' - it's been the 1st result in Google for more than a decade).
Nick has a passion for helping other business owners improve their operating conditions and bottom line results with tech. For more info, see:
https://merchantsvillage.com/About%20The%20Author.html
To hire Nick for tutoring, or if you'd like a software product developed, please call/text 215-630-6759 or send a message to nick@com-pute.com